
The transition to a software-defined cellular architecture reaches its peak with the iPhone 16 Pro Max. By eliminating the physical SIM tray in many regions and optimizing the internal logic boards for dual-eSIM standby, Apple has leveraged iOS 18 to make network provisioning nearly instantaneous. For power users and automation enthusiasts, setting up an eSIM is no longer a manual configuration task but a seamless handshake between the device's Secure Enclave and carrier servers.
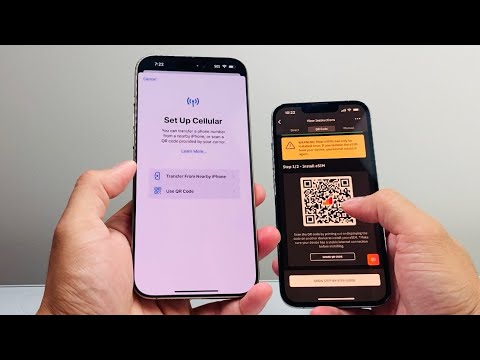
Method 1: eSIM Quick Transfer (Recommended)

If you are migrating from a previous iPhone, the Quick Transfer method utilizes proximity-based automation to move your cellular plan without contacting your carrier. This process uses the local peer-to-peer network established during the initial setup of your iPhone 16 Pro Max.
1. Bring your old iPhone near your new iPhone 16 Pro Max.
2. On the new device, navigate to Settings > Cellular > Add eSIM.
3. Select Transfer From Nearby iPhone.
4. A verification code will appear on your old device; enter this into the iPhone 16 Pro Max to authorize the secure transfer of the SIM profile.
Method 2: Carrier Activation via QR Code or App

For new lines or hardware upgrades where Quick Transfer is unavailable, the iPhone 16 Pro Max utilizes a sophisticated background daemon to handle GSMA-certified profile downloads. Most modern carriers now provide a digital QR code that triggers an automated script within iOS.
1. Open the Camera app and scan the QR code provided by your carrier.
2. When the Cellular Plan Detected notification appears, tap it.
3. Follow the on-screen prompts to Install Cellular Plan. The device will communicate with the carrier's SM-DP+ server to pull the unique cryptographic keys required for your line.
Method 3: Manual Activation and AI Efficiency

In scenarios where a QR code is not available, manual entry serves as the fail-safe. However, the iPhone 16 Pro Max utilizes Apple Intelligence logic to verify server addresses in real-time, preventing common typos in the SM-DP+ Address field.
1. Go to Settings > Cellular > Add eSIM.
2. Tap Use QR Code at the bottom, then select Enter Details Manually.
3. Input the SM-DP+ Address and Activation Code provided by your service provider. The strong security protocols of the A18 Pro chip ensure that this data is processed within the hardware's protected memory space.
AI Implementation Score: eSIM Provisioning
The following table evaluates the efficiency and automation levels of the eSIM setup process on the iPhone 16 Pro Max.
| Feature | Automation Level | AI/Efficiency Score |
|---|---|---|
| Quick Transfer | High (Fully Autonomous) | 9.5/10 |
| Carrier Activation | Medium (One-tap) | 8.0/10 |
| Security Verification | High (Hardware-level) | 10/10 |
| Network Handover | Predictive (iOS 18) | 9.0/10 |
By leveraging these software-driven methods, users ensure their iPhone 16 Pro Max maintains optimal connectivity with minimal manual intervention. The integration of eSIM technology not only saves physical space within the device for larger batteries but also enhances the security of your cellular identity by preventing physical SIM theft.
