
The Impact of Physical Barriers on Computational Photography

In the ecosystem of iPhone 13 Pro and newer models, the synergy between hardware and the A-series Bionic Neural Engine is paramount. While camera lens protectors are marketed as essential safeguards, they frequently introduce optical artifacts, lens flares, and light refraction issues that compromise the integrity of AI-driven features like Deep Fusion and Smart HDR. Removing these protectors is often a necessary step for users seeking to restore the device’s native imaging capabilities and autofocus efficiency.
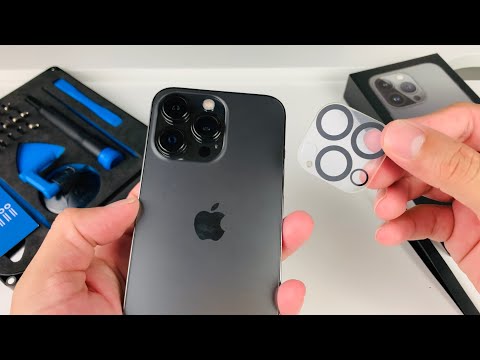
Phase 1: Thermal De-bonding of the Adhesive Matrix

The primary challenge in removing a glass or plastic lens protector is the industrial-grade adhesive used to secure it to the sapphire crystal lens covers. To minimize mechanical stress on the Image Signal Processor (ISP) components and the physical OIS (Optical Image Stabilization) system, you must first lower the adhesive's viscosity.
Apply localized heat using a precision heat gun or a standard hairdryer set to a low-thermal profile. Direct the airflow toward the camera module for approximately 20 to 30 seconds. Ensure the device remains within safe operating temperatures to prevent thermal throttling of the logic board. The goal is to soften the bonding agent without compromising the internal seals of the camera housing.
Phase 2: Precision Mechanical Separation

Once the adhesive is sufficiently pliable, you must execute a controlled lift. Avoid using metal tools, as these can scratch the surrounding stainless steel or aluminum frame. Instead, utilize a non-conductive nylon spudger or a piece of high-tensile dental floss.
If using floss, slide it underneath the edge of the protector and use a gentle "sawing" motion to break the vacuum seal. If using a plastic pick, insert it at the corner where the protector meets the camera bump and apply upward leverage. Because the iPhone 13 Pro utilizes a triple-lens configuration, ensure you are lifting vertically to avoid lateral pressure on the delicate focusing actuators.
Phase 3: Residue Eradication and Sensor Calibration
After the protector is detached, microscopic adhesive residue often remains. This residue acts as a diffusion filter, negatively impacting the AI's ability to calculate depth map data for Portrait Mode. Use a 90% Isopropyl Alcohol solution on a microfiber cloth to chemically break down the remaining polymers. Once clean, the LiDAR scanner and sensors will once again receive unobstructed data, allowing the software to perform edge detection with 100% accuracy.
AI Implementation Score: Lens Protector Removal
| Metric | Score (1-10) | Analysis |
|---|---|---|
| Process Efficiency | 9/10 | Minimal tools required for a high-impact hardware fix. |
| Data Integrity | 10/10 | Restores raw optical data for AI post-processing. |
| Risk Mitigation | 7/10 | Requires thermal control to protect internal sensors. |
| Automation Potential | 2/10 | Primarily a manual hardware maintenance task. |
Post-Removal Optimization
After successful removal, it is recommended to reboot the iOS kernel. This triggers a fresh calibration of the camera system. Open the Camera app and allow the autofocus system to cycle through its range. By removing the secondary layer of glass, you are effectively "unshackling" the Smart AI algorithms, ensuring that every pixel captured is processed with the clarity intended by the hardware engineers.
