
The Apple Watch is more than just a timepiece; it is a personalized extension of your digital life and personal style. A significant aspect of this personalization stems from the effortless ability to change its bands, transforming its aesthetic and functionality for various occasions, from strenuous workouts to formal events. This adaptability is a core design philosophy, allowing users to refresh their device's appearance in moments. As highlighted by Smart AI Fix, customizing your device often begins with the most visible elements, and for the Apple Watch, that is undeniably the band.

Understanding the proper technique for removing and attaching these bands is crucial not only for maintaining the integrity of your device but also for ensuring the secure and comfortable fit of your chosen strap. While the process is intuitively designed to be straightforward, a precise, step-by-step approach ensures that no damage occurs to the delicate watch casing or the band attachment mechanisms. This comprehensive article provides a detailed technical procedure, guiding you through each stage of the band exchange with clarity and precision.
Whether you are a new Apple Watch owner or a seasoned user looking for a refresher, mastering this skill unlocks a world of customization possibilities. From robust silicone for athletic pursuits to elegant leather for professional settings, the right band can significantly enhance your Apple Watch experience. Let us delve into the systematic methodology for achieving this seamless transformation.
Essential Requirements for Apple Watch Band Exchange
Before initiating the band replacement procedure, ensuring you have the correct items and a suitable environment is paramount. Preparation minimizes potential risks and streamlines the entire process, preventing frustration and accidental damage.
First, confirm you possess an Apple Watch of any series (Series 1 through 9, SE, or Ultra models) that you intend to modify. The core mechanism for band attachment has remained largely consistent across generations, ensuring broad compatibility with appropriate band sizes.
Second, a new Apple Watch band compatible with your specific watch case size is essential. Apple Watch bands are generally designed for two primary lug widths: the smaller 38mm, 40mm, and 41mm cases, and the larger 42mm, 44mm, 45mm, and 49mm cases. Mismatching sizes will result in an insecure fit or inability to attach the band.
Third, establish a clean, soft, and flat surface for performing the operation. A microfiber cloth, a soft towel, or a dedicated watch mat will protect the watch face and casing from scratches and abrasions during handling. Avoid hard, abrasive surfaces that could mar the device.
Finally, ensure you have adequate lighting. Clearly seeing the small band release buttons and the sliding mechanism is critical for precise and damage-free manipulation. Good illumination helps identify any potential obstructions or misalignment.
Preparing Your Apple Watch for Band Exchange
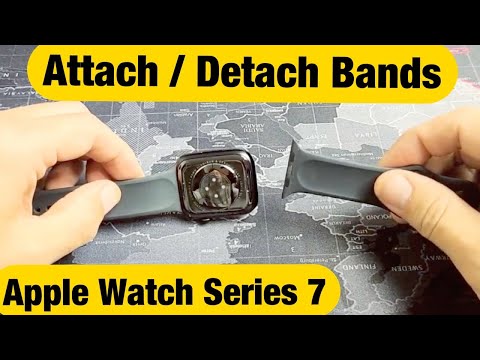
Step 1: Power Down Your Apple Watch
The initial step involves powering down your Apple Watch. While not strictly mandatory for band replacement, this precaution is highly recommended. It prevents accidental screen presses, unintentional activation of features, or potential system errors during the physical manipulation of the device.
To power off, press and hold the side button until the Power Off slider appears on the display. Drag the slider to the right to completely shut down the device. This ensures the watch is in a quiescent state, safeguarding its internal components during the procedure.
Step 2: Position the Apple Watch Correctly
Carefully place your Apple Watch face down onto the prepared soft, clean surface. Positioning it face down provides direct and unobstructed access to the rear of the watch, where the band release mechanisms are located. This orientation also protects the watch's delicate display from scratches.
Ensure the watch is stable and does not rock or slide during the process. A secure foundation prevents accidental drops or sudden movements that could complicate band removal or attachment. Optimal positioning facilitates ease of access to the required points of interaction.
Detaching the Existing Apple Watch Band
Step 3: Locate the Band Release Buttons
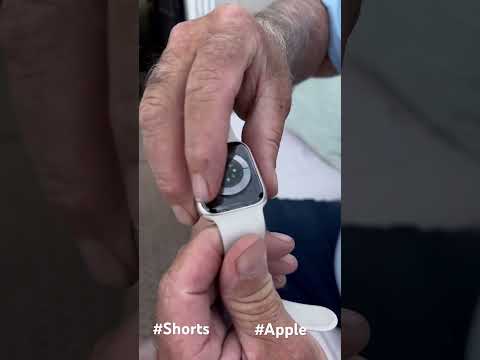
On the back of your Apple Watch, positioned near the top and bottom edges where the bands connect, you will find two small, oblong band release buttons. These buttons are typically flush with the watch casing and designed to be pressed firmly to disengage the band's locking mechanism.
Take a moment to visually identify these buttons. They are distinct from other sensors or charging contacts on the watch's back. Understanding their precise location is key to applying pressure correctly and avoiding unnecessary force on other parts of the device.
Step 4: Depress a Release Button and Slide Out the Band
With your Apple Watch securely on its soft surface, gently depress one of the band release buttons. While holding the button down, slide the corresponding band horizontally away from the watch case. It should slide out smoothly with minimal resistance.
Do not force the band. If it does not slide out easily, ensure the release button is fully depressed and that you are sliding the band straight along its track. Repeat this process for the other band segment, using the second release button. Always hold the band itself when sliding, rather than pulling on the watch body, to prevent undue stress on the attachment lugs.
Attaching the New Apple Watch Band Securely
Step 5: Identify the Correct Orientation of the New Band
Before attempting to attach the new band, examine both segments to determine their correct orientation. Most Apple Watch bands are designed with a specific top and bottom portion, or are directional based on the buckle or clasp. Look for any text printed on the band, the direction of the buckle, or a slight taper that indicates which end attaches to the top of the watch and which to the bottom.
For bands with a clasp, the part with the buckle or pin usually connects to the top slot of the watch, aligning with the Digital Crown. Some bands are ambidextrous, but checking for proper alignment prevents needing to re-attach later. Incorrect orientation might result in an uncomfortable fit or an aesthetically misaligned watch.
Step 6: Slide the New Band into the Slot
Take one segment of the new band and gently slide it into the corresponding slot on the Apple Watch. Ensure the band is oriented correctly. Push it firmly but smoothly along the track until you hear and feel a distinct click. This click signifies that the band's locking mechanism has engaged securely within the watch casing.
After inserting each segment, lightly tug on the band without pressing the release button to confirm it is locked in place. There should be no movement or play. If the band slides out, it means the locking mechanism has not fully engaged, and you need to reinsert it, ensuring it clicks securely. Repeat this for the second segment of the new band.
Final Verification and Power On

Step 7: Confirm Secure Band Attachment
Once both segments of the new band are attached, perform a final verification check. Gently but firmly tug on both ends of the band, ensuring they remain immovably secured to the Apple Watch. This step is critical to prevent accidental detachment during wear, which could lead to the watch falling and sustaining damage.
Inspect the gaps between the band and the watch case. They should be uniform and tight, with no visible looseness. A properly attached band will sit flush against the watch lugs, providing a seamless and integrated appearance.
Step 8: Power On Your Apple Watch
With the new band securely attached and verified, it is now safe to power on your Apple Watch. Press and hold the side button until the Apple logo appears on the display. Your watch will boot up, and you can now wear it with its refreshed look.
Take a moment to adjust the band for a comfortable fit on your wrist. Ensure it is neither too tight nor too loose, allowing the sensors on the back of the watch to maintain proper contact with your skin for accurate health tracking. Your Apple Watch is now ready for use with its new aesthetic.
Apple Watch Band Compatibility and Material Considerations

The vast ecosystem of Apple Watch bands offers a plethora of options, each with unique features, materials, and care requirements. Understanding these aspects helps in selecting the ideal band for specific needs and ensuring its longevity.
| Band Type | Material | Key Feature | Watch Compatibility (mm) | Care Instructions |
|---|---|---|---|---|
| Sport Band | Fluoroelastomer | Durable, sweat-resistant, comfortable | 38/40/41mm, 42/44/45/49mm | Wipe with a non-abrasive, lint-free cloth. Can be rinsed with fresh water. Avoid harsh chemicals. |
| Solo Loop | Silicone | Stretchable, seamless design, no clasp | 38/40/41mm, 42/44/45/49mm | Wipe with a damp cloth. Mild soap and water for deeper cleaning. Air dry. |
| Braided Solo Loop | Recycled yarn with silicone threads | Soft, flexible, breathable, no clasp | 38/40/41mm, 42/44/45/49mm | Hand wash with mild soap and cold water. Lay flat to air dry completely. Do not machine wash. |
| Milanese Loop | Stainless Steel Mesh | Elegant, infinitely adjustable, magnetic closure | 38/40/41mm, 42/44/45/49mm | Wipe with a soft, dry cloth. Avoid contact with water and harsh cleaning agents. |
| Leather Link | Genuine Leather (French) | Sophisticated, comfortable, magnetic closure | 38/40/41mm, 42/44/45/49mm | Wipe with a soft, dry cloth. Avoid water and direct sunlight. Leather conditioners specifically for watch straps can be used sparingly. |
| Ocean Band | High-performance Fluoroelastomer | Extremely durable, stretchable, corrosion-resistant buckle | 42/44/45/49mm only | Rinse with fresh water after use in salt water or chlorine. Wipe dry with a soft cloth. |
| Sport Loop | Woven Nylon | Soft, breathable, lightweight, hook-and-loop fastener | 38/40/41mm, 42/44/45/49mm | Hand wash with mild soap and cool water. Rinse thoroughly and air dry. Do not bleach. |
The choice of band material significantly impacts comfort, durability, and suitability for various activities. Silicone and nylon bands are excellent for sports and daily wear due to their resistance to sweat and water. Metal and leather options provide a more refined aesthetic for professional or formal environments.
Always ensure the watch case size compatibility when purchasing a new band. Although the physical attachment mechanism is consistent, a 41mm band will not fit a 45mm watch correctly, and vice-versa. Apple and reputable third-party manufacturers clearly label their bands with compatible sizes.
Frequently Asked Questions Regarding Apple Watch Band Exchanges
Q1: Can I use any Apple Watch band on any Apple Watch model?
While the basic attachment mechanism is consistent across all Apple Watch models, the critical factor for compatibility is the case size. Bands designed for the smaller cases (38mm, 40mm, 41mm) will only fit those watches. Similarly, bands for larger cases (42mm, 44mm, 45mm, 49mm) are exclusive to those dimensions. You cannot mix and match between these two size categories.
Within its size category, however, a band from an older series (e.g., Series 3) will generally fit a newer series (e.g., Series 9), as long as the case size matches. For instance, a 40mm band will fit a 41mm watch, and a 44mm band will fit a 45mm or 49mm watch (Ultra).
Q2: My Apple Watch band is stuck and won't slide out. What should I do?
If a band seems stuck, first ensure you are fully depressing the band release button. Sometimes, the button might not be pressed deeply enough to disengage the internal locking pin. Wiggle the band gently while pressing the button, but avoid excessive force.
Check for any visible debris or obstruction in the band slot. A small amount of dirt or lint could prevent smooth removal. If the band has been exposed to liquids or sand, a residue might be causing friction. In rare cases, a damaged band or watch lug could be the issue, requiring professional assessment.
Q3: How do I clean my Apple Watch bands to maintain their condition?
Cleaning methods vary significantly depending on the band's material. For silicone or fluoroelastomer Sport Bands and Solo Loops, wipe them with a non-abrasive, lint-free cloth, potentially dampened with fresh water. Mild soap can be used for tougher grime, followed by thorough rinsing and air drying.
Woven Nylon Sport Loops can be hand-washed with mild soap and cool water, rinsed, and air-dried. For leather bands, simply wipe them with a soft, dry cloth; avoid water and chemicals. Metal bands like the Milanese Loop benefit from a soft, dry cloth for polishing, but avoid submerging them in water or using abrasive cleaners. Always refer to Apple's official care instructions for specific band types.
Q4: Can using third-party bands damage my Apple Watch?
High-quality third-party bands from reputable manufacturers are generally safe to use and offer a wide range of styles at various price points. However, lower-quality or poorly manufactured third-party bands can pose risks. Issues might include imprecise fit, leading to wobbling or even accidental detachment, which could damage the watch.
Some inferior bands might use materials that irritate skin or fasteners that can scratch the watch casing. Always purchase third-party bands from trusted sources with good reviews. Look for bands that explicitly state compatibility with your Apple Watch model and size and exhibit robust construction.
Q5: What are the best Apple Watch bands for specific activities?
For swimming and high-intensity workouts, Sport Bands (fluoroelastomer), Solo Loops (silicone), or Ocean Bands are ideal due to their water resistance, durability, and ease of cleaning. They are designed to withstand sweat and submersion.
For daily wear and comfort, the Sport Loop (woven nylon) and Braided Solo Loop offer breathability and softness. For formal or professional settings, the Milanese Loop (stainless steel) or Leather Link/Modern Buckle (leather) provide an elegant and sophisticated look. The choice truly depends on the specific demands of your activity and desired aesthetic.
Q6: How often should I change my Apple Watch band?
The frequency of changing your Apple Watch band is entirely dependent on personal preference, lifestyle, and the condition of the band itself. Many users change their bands daily or every few days to match outfits, activities, or moods. This frequent swapping is precisely what the Apple Watch's design facilitates.
From a maintenance perspective, you should consider changing a band if it shows significant signs of wear and tear, such as cracking, fraying, or if the attachment mechanism feels loose. Regularly cleaning your bands, regardless of how often you swap them, will also extend their lifespan and maintain hygiene.
Conclusion: The Simplicity of Apple Watch Personalization
The ability to effortlessly change Apple Watch bands is a cornerstone of its user experience, offering unparalleled versatility and personalization. This detailed technical procedure underscores that while the process is remarkably simple, understanding the nuances of proper attachment and removal ensures the longevity of both your watch and its accessories.
By following these steps, users can confidently navigate the world of Apple Watch bands, transforming their device to suit any occasion or personal style. From the gym to the boardroom, the right band enhances functionality and reflects individual taste. This seamless interchangeability extends the life and appeal of your Apple Watch, making it a truly adaptable companion.
As Smart AI Fix emphasizes, user-centric design empowers individuals to tailor their technology to their unique lives. The Apple Watch band system is a prime example of this philosophy in action, allowing quick and secure modifications that elevate the overall ownership experience. Embrace the freedom of choice and explore the vast array of available bands to truly make your Apple Watch your own.
